Choosing the right garden hoe can make a significant difference in your weeding efforts. Let’s explore some of the best options available, categorized by type.
Best Draw Hoe Options
Draw hoes are versatile tools, perfect for breaking up soil and uprooting weeds. Here are some top picks:
- Radius Garden Ergonomic Hand Hoe: This draw hoe features an ergonomic design that reduces strain on your hands and back. The sharp stainless-steel blade cuts through tough soil with ease.
- Ames 11-Inch Draw Hoe: A classic choice, this hoe is made from durable steel and has a comfortable wooden handle. It’s great for deep cultivation and can tackle stubborn weeds.
Top-Rated Scuffle Hoes
Scuffle hoes excel at surface weeding, making them ideal for managing weed growth without disturbing the soil too much. Consider these options:
- Hoss Tools Scuffle Hoe: Known for its durability and effectiveness, this hoe’s push-pull action swiftly removes weeds while preserving the surrounding soil.
- Garden Weasel Scuffle Hoe: Lightweight and easy to maneuver, this tool is perfect for quick weeding sessions, allowing you to cover ground efficiently.
Most Efficient Wheel Hoes
For gardeners with larger areas to manage, wheel hoes can save time and energy. Here are some efficient models:
- Hoss Tools Wheel Hoe: This model comes with interchangeable attachments, making it adaptable for various gardening tasks, from weeding to planting.
- Earthway Garden Seeder and Wheel Hoe: Combining seeding and weeding capabilities, this tool allows you to efficiently tend to your garden without switching tools frequently.
Selecting the right hoe tailored to your gardening needs can enhance your weeding experience, leading to healthier plants and less effort overall.
Applying Transfer Tape
When it comes to applying transfer tape, choosing the right type is essential for a smooth application. A high-quality transfer tape will make a world of difference in how your design adheres to the surface. Look for tape that is appropriate for the vinyl you are using—some are designed specifically for delicate vinyl, while others work better with thicker materials.

Techniques for Smooth Application
- Positioning: Start by placing the transfer tape over your design carefully. Align it without pressing down initially to avoid mishaps.
- Squeegee Method: Use a squeegee or credit card to gently push the transfer tape onto the vinyl. Start from the center and move outward to minimize air bubbles.
Avoiding Air Bubbles and Wrinkles
Air bubbles can ruin an otherwise flawless project. To avoid them:
- Slow and Steady: Don’t rush! Apply the tape slowly and steadily to give yourself time to adjust if needed.
- Lift and Reapply: If you notice a bubble forming, lift the tape gently at that spot and reapply it, smoothing it down as you go.
With these techniques, you’re setting yourself up for success in adhering your designs. Now that you have a solid grasp on how to apply transfer tape, you’re ready to tackle the next step in the process!
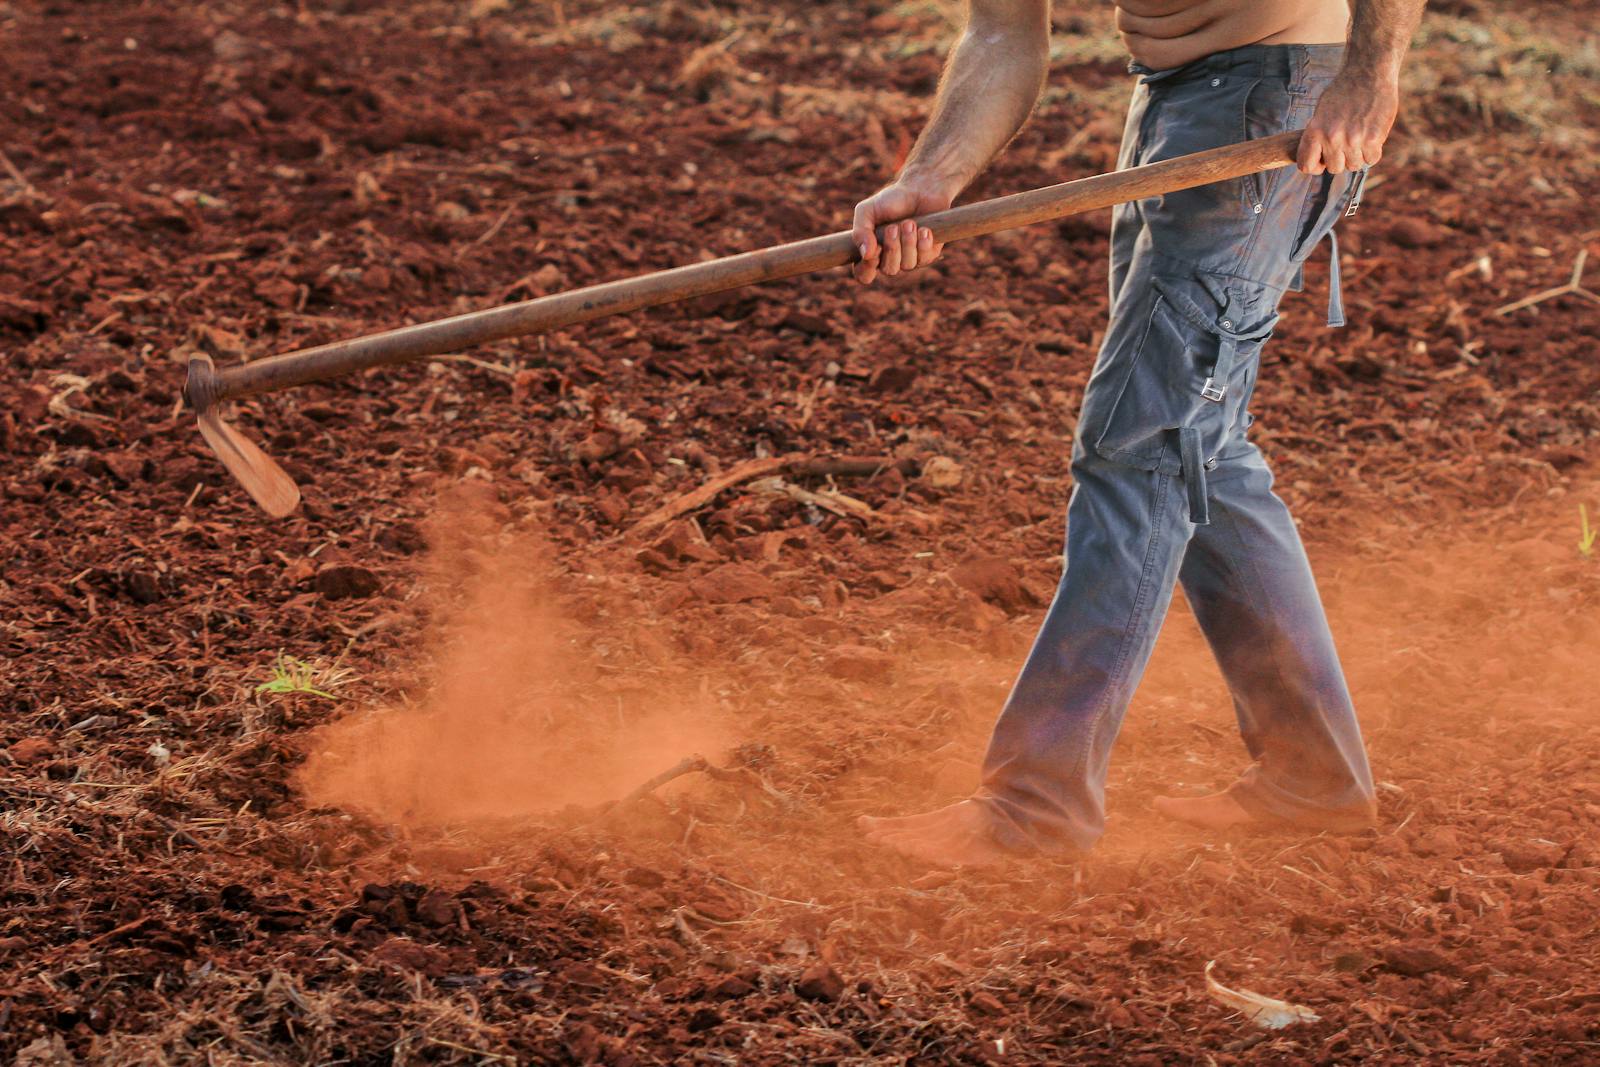
Proper Techniques for Using Garden Hoes
Using a garden hoe effectively is all about mastering the right techniques. Let’s dive into how you can optimize your weeding game.
Correct Body Posture and Grip
Good posture is essential while hoeing. Stand with your feet shoulder-width apart to maintain balance. Keep your back straight and slightly bend your knees to avoid straining your lower back. Grip the handle firmly, using both hands if possible—this gives you better control and leverage as you work.
Effective Weeding Motions
When weeding, use smooth, controlled motions. For draw hoes, a pushing motion works best for digging into the soil, while a pulling action helps to uproot weeds. Scuffle hoes benefit from a push-pull technique, allowing you to slice through weeds just below the surface. Remember to work at a steady pace and keep your movements fluid to maximize efficiency.
Tips for Minimizing Strain and Maximizing Efficiency
To minimize strain, take regular breaks and switch tasks if necessary. Always position yourself so that you’re not overreaching; this will save your back and shoulders from unnecessary fatigue. Also, ensure your hoe is well-maintained—sharp blades require less effort and yield better results.
With these techniques in hand, you’ll find weeding is less of a chore and more of an enjoyable task. Now that you’re equipped with proper methods, let’s explore how to maintain and care for your tools to keep them in top shape.
Flipping and Adhering
Flipping your design correctly is a game changer when it comes to applying vinyl. This step ensures that your artwork stays intact, allowing you to achieve a professional finish.
Proper Flipping Technique
Start by gently lifting the transfer tape with your design attached. Hold the edge of the tape at a 45-degree angle to the surface where you’ll be adhering the vinyl. This angle helps prevent the design from stretching or distorting. Slowly press down the tape as you flip it over, ensuring that the vinyl makes contact evenly with the surface. Keep an eye on those delicate details; they can easily peel away if not handled with care.
Aligning the Design Correctly
Alignment is crucial. Take a moment to visualize where you want your design to go before making contact. Use reference points, such as edges or center lines, to help position your design accurately. If you have multiple elements, consider using a ruler or a level to ensure everything is straight. Remember, once the vinyl touches the surface, it’s tough to reposition without risking damage.
Ensuring Full Adhesion to the New Surface
To guarantee that your design adheres fully, use a squeegee or a credit card to press down firmly. Start in the center and work your way out to the edges to eliminate air bubbles. Pay extra attention to those intricate parts—making sure they’re secure will give your project a polished look. If you notice any air pockets, carefully lift the vinyl back and re-apply, continuing to smooth it out.
As we wrap up this chapter, mastering the flipping and adhering process sets you up for success in the next stage of your vinyl project. The right technique here will pave the way for a flawless finish as you move forward.
Maintenance and Care
Keeping your garden hoes in top-notch condition is vital for efficient weeding and overall gardening success. Proper maintenance helps extend the lifespan of these valuable tools, ensuring they perform well season after season.
Cleaning and Storing Garden Hoes
After each use, it’s important to clean your hoes to remove dirt, mud, and plant residue. A simple wash with soap and water followed by a thorough rinse will do wonders. For stubborn soil, a wire brush can help. Once clean, dry the hoe completely to prevent rust formation.
Storing your hoes properly is just as crucial. Hang them on a wall or keep them in a dry shed to avoid moisture exposure. Avoid leaning them against walls where they can fall or get damaged.
Sharpening Blades for Optimal Performance
A sharp blade is essential for an effective garden hoe. Regular sharpening not only enhances its cutting ability but also reduces the effort needed during use. Use a file or sharpening stone to touch up the edges. Aim for a smooth, even finish on both sides of the blade. This small step can make a significant difference in how easily you can tackle weeds.
Repairing or Replacing Worn Parts
Even the best tools can suffer wear and tear over time. Inspect your hoes regularly for any signs of damage, like a cracked handle or dull blade. If the blade becomes too worn down, consider replacing it instead of buying a new hoe. For handles, wood can often be sanded and treated, while fiberglass may require complete replacement. Addressing these issues promptly ensures safety and keeps your gardening efficient.

With proper care, your garden hoes will remain reliable companions in your weeding efforts, setting the stage for healthier plants and a more enjoyable gardening experience. Now that we’ve covered the essentials of maintaining your tools, let’s explore techniques to maximize their effectiveness in the garden.
Conclusion: Revolutionizing Your Gardening Experience
Using the right garden hoe can vastly improve your gardening efficiency and productivity. These tools not only help you effectively manage weeds but also promote healthier soil and plants. By reducing competition for resources, a good hoe allows your plants to thrive.
Investing in quality tools pays off in the long run. A well-made hoe can withstand wear and tear, ensuring you won’t need frequent replacements. Plus, the right features—like handle length and blade sharpness—make weeding easier and less strenuous on your body.
Remember, gardening is as much about technique as it is about tools. By mastering proper hoe usage and maintaining your equipment, you’ll find gardening becomes not just a chore, but a rewarding hobby. Embrace these practices, and watch your garden flourish like never before!
Removing the Backing
Once you’ve successfully flipped and adhered your design, it’s time to tackle the next essential step: removing the backing. This stage is crucial for ensuring that your vinyl adheres perfectly to the intended surface.
Techniques for Smooth Backing Removal
To start, gently peel the backing away from the vinyl at a 45-degree angle. This approach minimizes the risk of lifting any delicate parts of your design. It’s important to go slowly—if you feel resistance, stop and press down on the vinyl a bit more before trying again. If your design has intricate details, consider using a weeding tool to help lift the backing without disturbing the vinyl.
Handling Delicate Areas
When working with delicate areas of your design, patience is key. For particularly intricate designs, hold the backing at a sharper angle while peeling. This helps reduce tension on the fine details. If you notice any pieces wanting to lift along with the backing, simply press them back down before continuing to remove the rest of the backing.
Troubleshooting Stuck Vinyl
Sometimes, despite your best efforts, the vinyl may stick to the backing. If this happens, don’t panic! Gently rub the area where the vinyl is stuck with a soft cloth or your finger to warm it up slightly. The heat can sometimes help release the adhesive grip. If it’s still not budging, consider using a craft knife to carefully slice along the edge of the vinyl to free it from the backing.
By mastering the technique of backing removal, you will set yourself up for success in creating beautiful vinyl projects. Once you complete this step, you’ll be well on your way to perfecting your final touches and cleanup.